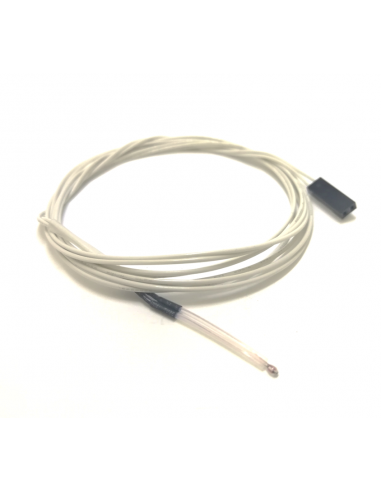
Upgrade your 3D printer's performance with our high-quality Thermistor designed for hotend temperature sensing. Engineered with precision, this thermistor ensures accurate and consistent temperature readings, crucial for achieving top-notch print quality. The 1-meter long cables provide flexibility and ease of installation, making it an ideal replacement or upgrade for your 3D printer.<?xml:namespace prefix="o" ns="urn:schemas-microsoft-com:office:office"?></o:p>
Key Features:</o:p>
· High Precision: 3950 1% thermistor for accurate temperature control</o:p>
· Durable Construction: 1.8mm glass head for reliable performance</o:p>
· Enhanced Protection: PTFE Tube (0.6*1mm) safeguards the thermistor and cables</o:p>
· Easy Installation: Pre-assembled with shrink wrap between the thermistor and cables</o:p>
· Versatile Compatibility: Suitable for a wide range of Creality 3D printers</o:p>
Technical Specifications:</o:p>
· Thermistor Type: NTC 100K (3950 1%)</o:p>
· Cable Length: 1 meter</o:p>
· Thermistor Head Diameter: 1.8mm (glass head)</o:p>
· Protective Tube: PTFE Tube (0.6*1mm)</o:p>
· Cable Protection: Shrink wrap between thermistor and cables</o:p>
· Temperature Range: -40°C to 300°C</o:p>
· Accuracy: ±1%</o:p>
Compatible Models:</o:p>
· Creality Ender Series: </o:p>
o Ender 3</o:p>
o Ender 3 Pro</o:p>
o Ender 3 V2</o:p>
o Ender 3 Max</o:p>
o Ender 5</o:p>
o Ender 5 Pro</o:p>
o Ender 5 Plus</o:p>
- Ender 3 V2 Neo</o:p>
- Ender 3 V Neo</o:p>
</o:p>
· Creality CR Series: </o:p>
o CR-10</o:p>
o CR-10S</o:p>
o CR-10 V2</o:p>
o CR-10 V3</o:p>
o CR-10 Mini</o:p>
o CR-6 SE</o:p>
o CR-20</o:p>
o CR-20 Pro</o:p>
Applications: This thermistor is designed to replace or upgrade the hotend thermistor in your Creality 3D printer. Whether you are performing maintenance or looking to improve the accuracy of your temperature readings, this well-assembled thermistor will save you time and ensure optimal performance.</o:p>
Installation Instructions:</o:p>
1. Power off and unplug your 3D printer.</o:p>
2. Remove the existing thermistor from the hotend.</o:p>
3. Install the new thermistor, ensuring the glass head is properly seated.</o:p>
4. Route the 1m long cables securely and connect them to the mainboard.</o:p>
5. Power on the printer and calibrate if necessary.</o:p>
Enhance your 3D printing experience with this reliable and easy-to-install thermistor. Order now to ensure your prints are always precise and of the highest quality.</o:p>
100K Glass-sealed Thermistor Default Table.DOC</o:p>

